Alice in Wonderland (or Alice’s Adventures in Wonderland by Lewis Carroll) is in the public domain. Therefore as long as it doesn’t resemble the Disney version of Alice in Wonderland (or any other copyrighted variations of the original book) then I have free standing to sell my interpretation of the book. 🙂
Unfortunately, my schedule doesn’t allow me to have open private commissions at the moment.
I can at most build 1 – 2 papercrafts a month depending on the complexity, so it’s very limiting if I open private commissions. Commercial commissions allow these box subscriptions to distribute my artwork on a larger scale to you all than one-on-one commissions would.
But I’m not against it in the future if my schedule opens up to allow it! 🙂
Alice in Wonderland (or Alice’s Adventures in Wonderland by Lewis Carroll) is in the public domain. Therefore as long as it doesn’t resemble the Disney version of Alice in Wonderland (or any other copyrighted variations of the original book) then I have free standing to sell my interpretation of the book. 🙂
Ooh that’s an interesting thought! I definitely have noticed an evolution of how I design certain things, specifically with faces.
Early on I would have exposed eyes pasted over the face, and shape the nose with two separate facial pieces. Now I’ve found that cutting out the eye sockets and cutting a ‘flap’ for the nose creates natural shadows and is much more appealing to my vision in concept.
I’ve also really adopted the triangle cuts I’ve used as guides to help with the alignment and precision of each paper piece. (seen in my WIPs)
It’s something that I wouldn’t be able to take advantage of if I didn’t have a Cricut, but it definitely makes things faster (and fun) for assembly.
As far as goals, I’m really trying to focus on creative uses of color. I want to try more abstract schemes like the Six of Crows papercraft, instead of standard, everyday life color schemes
Ooooh definitely papercraft – but it’s also very (satisfyingly) tiring at times. Drawing is a great way to for me unwind and relax for evening.
Unfortunately, my schedule doesn’t allow me to have open private commissions at the moment.
I can at most build 1 – 2 papercrafts a month depending on the complexity, so it’s very limiting if I open private commissions. Commercial commissions allow these box subscriptions to distribute my artwork on a larger scale to you all than one-on-one commissions would.
But I’m not against it in the future if my schedule opens up to allow it! 🙂
The Ace of Shades “The Lovers, Reversed” papercraft is still my favorite piece. The mish-mash of symbolisms for the Lovers / Fool tarot cards and story elements fit together so well. The trifecta imagery of the golden God’s Robe / City Skyline / Spade was especially fun.
I use the patterns (or filigree) as a form of highlighting / shading. Similar to how an illustrator would use pointillism or cross-hatching to create different values with only two colors. Filigree is a more decorative form of those techniques for my papercrafts. I first draw major line forms to get the flow of the pattern, then fill in the gaps with random swirls or linework to create varied shapes as I go.

I start by re-listening to the book for details and symbolisms. I take a lot of liberties with the art, but I don’t want to stray from the spirit of source material. I love adding in as much symbolism and hidden details as possible so avid readers can spot them
I try to decide what dimension and size of frame I’ll use to house the papercraft. The depth and shape of the frame will help me coordinate how many layers of detail to include (foreground, middleground, background) and how to compose the scene within the space. I’m really adamant on highlighting the books’ world building into the papercrafts – it’s just as important as the characters. I will use Photoshop on my Surface Pro tablet to sketch out the composition and characters. I will also begin to paint the filigree or linework patterns – they are basically hard brushstrokes in Photoshop that I later will convert to vector shapes.
In order to expedite the process (and save my hand from immense pain) I use a Cricut to cut out the heavy or intricate pieces in the papercraft. Other pieces that are minor or too detailed for Cricuts are cut by hand with an X-Acto knife. Cricuts cut paper by reading SVG vector files which I can create and export from Photoshop by drawing each potential piece of paper with a vector pen tool. This requires a lot of pre-planning for when I have to assemble later on as I have to think about layering, line thickness, and leaving room for glue.
An issue I run into with these papercrafts is that I’m usually working with 12×12” stock paper, while the frames I use range from 11×14“ to upwards of 16 x 31”. The decorative paper (usually black) I used around the edges of the pieces are usually made up of several separate pieces as I cannot cut anything longer or wider than 12”. Before I export my SVGs to my Cricut, I have to meticulously check each vector shape to make sure that there are no strenuous bezier curves (or they may warp) but also to make sure the pieces can fit within a 12 x 12” area. Once I’ve exported the SVG, I import them into Cricut’s design area and probably spend an hour or two arranging the different pieces into groups of color and pack them like sardines in a can so that I waste as little as paper as possible.
Ahhh this is the most intimidating aspect – choosing paper colors. My color options in Photoshop are nearly limitless, but I have only so many colors available in paper. No matter how much I try, there will always be a slight difference in hue, saturation and light/darkness between digital and paper colors. For pieces that absolutely need a specific color in order to play nice with the others, I’ll usually cut them on generic white (or dark) cardstock and paint them the color I need.
Most characters will need their faces prepped before assembly. I use my Surface Pro as a poorman’s (is it really, though?) light box to transfer and trace the face features to the paper from the guide I printed out from the digital concept art. I’ll then cut out the eyes and mouth (if open) and add scraps of paper or paint to fill in the rest of the features. Pieces that require custom color paint I will usually complete with sponges as this gives an even distribution of paint to the paper and limits the chance of seeing brushstrokes or other unwanted textures. On the flipside, almost every background is hand painted, and this is really where I want the brushstrokes to shine through for great texture. I’ll usually dry paint these with my cheap old acrylics I’ve had for 10+ years – nothing special.
Yay! The fun part! Pretty straight forward; I’ll use my printed guide to line up the pieces one-by-one and glue them together. Repeat! These are the videos you usually see on the WIP Wednesday Stories.
Any final touches needed like painted sparkles or skin blush, etc. will be added at this stage if not already done.
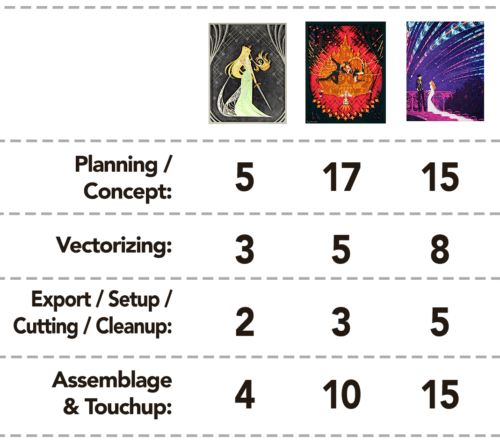
It depends on the complexity and size of the piece, as well as if I’m running into artistic blocks during the concept phase. An average breakdown of hours for each step for a few different pieces:
My absolute best tip for 2D papercrafting is practice drawing basic shapes for form. Many artists begin illustrations with simple shapes to build their subjects before adding detail.
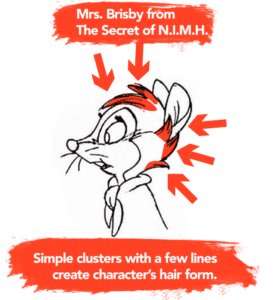
Papercrafting is devolving your concept back into simple shapes and contours. It’s important to simplify your shapes to be “clusters” if something becomes too detailed. Don Bluth utilized this technique in a lot of his films, especially with hair!

I started papercrafting when I was in middle school, but vastly different from the paper art I do now. I used to make 3D paper models from commercially made paper kits. My father gifted me my first paper kit (like on the left) from Germany and I was hooked!
Unfortunately, it was very damaging to my hand to continuously cut paper for hours on end, so I stopped the hobby around early high school. Years later, with the immergence of tools like Cricut Machines, it saved my hand from a lot of hard cutting labor and I was able to jump back in with new vigor and create my own “paper kits”!